MoCap VR
HTC Vive VRMocap – Your own motion capture studio
Table of Contents
- MoCap VR#Introduction
1.1 About motion capture
1.2 Our package information - MoCap VR#Setup
2.1 Required hardware
2.2 Optional/Recommended hardware
2.3 Required software
2.4 Preferred trackers positioning on body and custom character
2.5 Safety notice - Getting started inside Unity
3.1 Project setup
3.2 MoCap VR#Import process
3.3 MoCap VR#Possible post import problems. - User Interface
- Recording workflow
- Additional Information
6.1 Recommended software
6.2 Contact and support - MoCap VR#References
To access to online version of this documentation use this link, some issues caught be already solved and described. |
|---|
1. Introduction
1.1 About Motion Capture
Motion capture (sometimes referred to as mo-cap or mocap, for short) is the process of recording movement of objects or people. It is used in military, entertainment, sports, medical applications, also for validation of computer vision and robotics. In filmmaking and video game development, it refers to recording actions of human actors and using that information to animate digital character models in 2D or 3D computer animation.
1.2 Our Package Information
Our VRMocap package is a ground-breaking tool for Unity Engine which is easy to set up, calibrate and makes it possible to track and record your movement with unparalleled precision. You can then export the animation to FBX file, which can be used in any other program - all this without taking off your VR headset. No additional software is needed.
We recommend using trackers for top-notch animations, however, the solution we are introducing is versatile and flexible, therefore trackers are optional - you can successfully record animations with only 2 basic Vive controllers.
2. Setup
2.1 Required hardware
One HTC Vive set (headset, two controllers, base station)
The workstation that meets the minimum requirements for both Unity and HTC Vive
Unity requirements:
Operating System: Windows 7 SP1+, 8, 10, 64-bit versions only; macOS 10.11+
CPU: SSE2 instruction set support.
GPU: Graphics card with DX10 (shader model 4.0) capabilities.
HTC Vive requirements:
Operating System: Windows 7 SP1, Windows 8.1 or later, Windows 10
CPU: Intel Core i5-4590/AMD FX 8350 equivalent or better.
GPU: NVIDIA GeForce GTX 970, AMD Radeon R9 290 equivalent or better
Memory: 4GB RAM or more
Video Output: HDMI 1.4, DisplayPort 1.2 or newer
2.2 Optional/Recommended hardware
HTC Vive Trackers (the more the merrier) up to 7.
Straps for keeping trackers in place.
2.3 Required Software
Unity 2018.2+
Steam
SteamVR (downloaded from Steam)
.NET 4.x
2.4 Preferred trackers positioning on body and custom character
We highly recommend positioning trackers on your body as shown below. This will ensure both the best calibration and recording quality.
If you are having difficulties during calibration due to different body proportions go to Scene → Non-VR Objects → Environment → Calibration Model → Trackers Colliders and adjust their size to your fitting.![]()
| Note: If you are using a custom character in our package it needs to have a bone at the height of the eyes. You need to link this bone as Head inside Unity Avatar. |
|---|
2.5 Safety notice
For virtual reality safety precautions, please visit official HTC Vive documentation or SteamVR official support page for further details:
https://www.htc.com/managed-assets/shared/desktop/vive/Vive_PRE_User_Guide.pdf
https://steamvr.steampowered.com
3 Getting started in Unity
3.1 Import process.
Download SteamVR Plugin

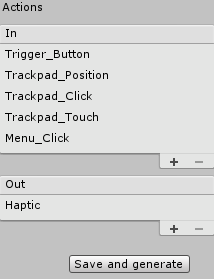
Open SteamVR_Input window (Window/SteamVR Input), create and generate these actions :
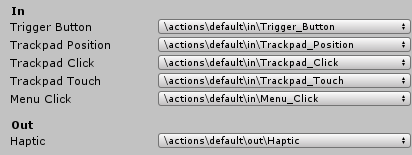
Open binding UI from SteamVR_Input window and link each action to its controller button. If you are using additional Vive trackers, enough to create an empty binding for one tracker role and set this role to all trackers.
Download and import VR MoCap package from AssetStore.

Find VR Mocap Input Settings in Project tab (Assets/VRMotionCapture/Resources) and assign Actions with generated SteamVr Input Actions.
Open MainMocapScene in root Mocap folder. Now the project is ready to work.
Note: Our package supports (but not required) FinalIK unity package, to start work with it just need to import FinalIK package into the project with our package and hit Update IK Preset (Tools/VR Motion Capture/Update IK preset).
ATTN: You need to have Steam enabled, otherwise possible issues with inputs
3.2 Possible post import problems.
1."Null propagating operation" error
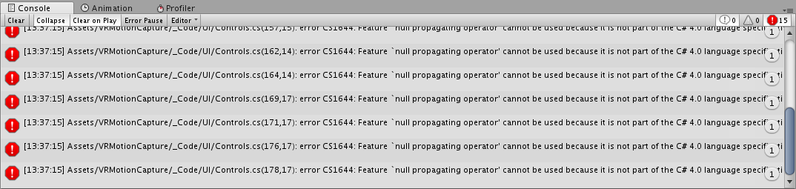
Solution: Need to change .NET version in Project Settings -> Player to 4.x
2. Package code requires an unexisting namespace
%20-%20MainScene.unity%20-%20VR%20MoCap%20-%20PC,%20Mac%20%26%20Linu.png?version=2&modificationDate=1547472029137&cacheVersion=1&api=v2&width=800&height=155)
Solution: Import SteamVR package from AssetStore.
3. All fields in prefabs are empty(or missing references)
Solution: Right click on prefab and hit Reimport prefabs.
4. My controller UI, teleport (or something else) working on another hand
Solution: That's happened sometimes in a case when on the start of Unity EditMode one or both controllers lost track.
4. User Interface
Our interface is very minimalistic to keep things simple. Every important information about your current state is displayed on your right.
To bring up the Motion Capture menu simply click Menu Button on your HTC Vive controller (as shown below)
The user interface is used only for visualizing, buttons bindings work even if UI is disabled.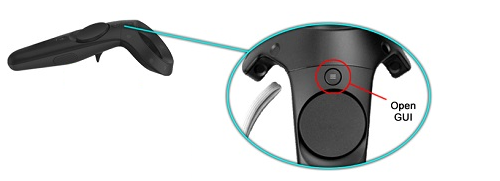
This will display the radial menu that is controlled by trackpad, to confirm your selection you need to click it while keeping your finger in the desired section.
UI controls and button bindings | |
|---|---|
 Hold to activate teleport raycaster, let go to teleport, works only after the animation was recorded. Hold to activate teleport raycaster, let go to teleport, works only after the animation was recorded. |  |
 Enter recalibration state to link again your controller/trackers Enter recalibration state to link again your controller/trackers | |
 Confirm your calibration Confirm your calibration | |
5. Recording Workflow
Default preset for Inverse Kinematic is built-in MecanimIK. When you import FinalIK into our project, the preset will be changed to work with FinalIK package. When everything is turned on, detected and ready, hit Play inside Unity.
First, you need to calibrate your headset, controllers, and trackers by aligning your gear with the calibration model on the scene and confirming your position. Get the same as Calibration Model pose and hit Calibration Button![]() . During calibration the environment is blue and controllers are vibrating. The mirrors are active on the scene after calibration ends, they are used for preview to check whether you are satisfied with calibration.
. During calibration the environment is blue and controllers are vibrating. The mirrors are active on the scene after calibration ends, they are used for preview to check whether you are satisfied with calibration.
When you are satisfied with the calibration hit Calibration Button![]() to confirm calibration, otherwise hit Recalibration Button
to confirm calibration, otherwise hit Recalibration Button![]() to repeat the calibration process. After you confirm calibration, you are ready to record.
to repeat the calibration process. After you confirm calibration, you are ready to record.
To begin recording simply pull the trigger on your controller, the environment now will change to red. Maximum animation length is 40 seconds. To stop recording pull the trigger once again.
The files now are being exported to Recorded Animations the folder in Assets (by default) and model with animation are being imported on the scene for you to preview what you have recorded.
6. Additional Information
6.1 Recommended Software
We highly recommend using FinalIK package with our motion capture to get the most of your recording, the FinalIK preset is already in our project and it will work out of the box when imported, therefore replacing MecanimIK. As for animation edition, we recommend using Blender with Curve Simplify add-on or Maya. For converting FBX from ASCII format to binary use FBX Autodesk Converter.
6.2 Contact and support
If you have any inquiries, problems or suggestions, feel free to contact us by mail: vrmocap.team@gmail.com
7. References
1. https://en.wikipedia.org/wiki/Motion_capture
2. https://unity3d.com/get-unity/download/archive
3. https://assetstore.unity.com/packages/tools/animation/final-ik-14290
4. https://www.blender.org/
5. https://www.autodesk.pl/products/maya/overview
6. https://www.htc.com
7. https://en.blender.org/index.php/Extensions:2.6/Py/Scripts/Curve/Curve_Simplify
8. https://assetstore.unity.com/packages/tools/animation/final-ik-14290